Using IceLock Pegs
Setting the Pegs In the Ice
Method 1: Direct Net Placement
This method has you place the post in the net and drop the net onto the ice in your desired location.
Pros:
- Fastest method
- Good for moving nets around in practice
Cons:
- May not go deep enough on colder/harder ice, causing the peg to not hold as well
- Lower accuracy for the peg placement
Method 2: Manual
This method has you pound the peg into the desired location, then put the peg into the post and set it into place.
Pros:
- Most control and accuracy when placing the pegs
- Can get more depth with harder/colder ice surfaces
Cons:
- Slower to get the pegs set up.
- It can be overkill in some situations
Helpful Tips
If the Pegs Ever Come Out:
- The pegs may come off from a very hard impact
- For best results, squirt water in the spot the pegs were in, then place the peg back in and wait about 5 minutes to put heavy loads back onto it.
Getting the Pegs To Stay In Better:
- To get a hold that will stay for a long duration, it’s best to squirt some water after seating the peg for the first time to have the ice freeze around the spikes.
- Let the pegs freeze for about 5 minutes before heavy use
Dealing With Leftover Steel Pegs:
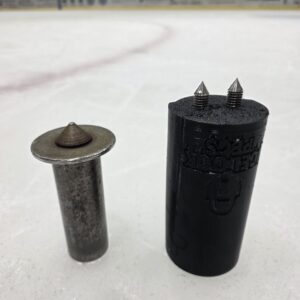
- Due to steel pegs leaving a V in the ice due to their shape, this can create a ramp effect
- Shown on the right is the comparison of the shape of steel pegs vs IceLock Pegs
- IF YOU PLAY AFTER A SESSION THAT USED STEEL PEGS, you should wait about 5-8 minutes after seating the pegs for the ice to freeze around the pegs.
- This is due to the steel spikes leaving a large pool of water behind after a Zamboni passes. This is inevitable, but it will give you the best performance to let the pegs freeze.
Adjusting the Spike Depth
The pegs ship with the shortest depth (about 18 mm or 0.7 in). Each spike can be rotated in and out to achieve the desired depth, allowing you to fit your ice surface perfectly.
To adjust the spike depth, you will need a pair of pliers or vice grips. Grab onto one of the spikes tightly and rotate counterclockwise to increase the depth of the spikes or clockwise to decrease the depth.
When adjusting, be mindful that some rinks’ ice is not very thick, so you could hit the concrete if you extend it too far for your ice sheet.
The pegs perform the best the deeper into the ice they can grip; however, hitting concrete will make the pegs perform worse. For the best performance, adjust the pegs to fit your rink’s ice depth.
Removing the Covers
The pegs come pre-assembled with covers for the spikes. This cover is made from a durable and flexible material. It is a tight fit to not fall off, and can be removed by grabbing the center of the cover and pulling.